Raspberry Pi and SDStore (Python 3)
This post is an extension of my previous post. In that post I outline how to setup SDStore with Django 1.11 and Python 3. In this post we are going to setup automatic deployment to a Raspberry Pi using a Python 3 fork of Fabric.
Overview
To get SDStore running on a Raspberry Pi (RPI) we need to turn the Pi into a webserver running on our local network. This is quite tricky and involves a lot of different technologies. Thankfully there are scripting tools which can help us. We are going to use Fabric because it is the one I am most familiar with, however Python 3 support is not yet available on the official project and we will have to use a fork. If I get time I will write an Ansible tutorial which does support Python 3 and is becoming the de facto tool for automated deployment.
That said, what will Fabric do for us? Well, it will install and configure Python 3, virtual environments, databases, Gunicorn, Nginx and anything else we ask it to. Writing a fabric script (a fabfile.py) can be time consuming and complex. Luckily for you I have already written one and we will download it a bit later.
Perparing the Raspberry Pi
I am going to assume you are starting with a fresh install of Raspian installed via NOOBs. This is a sensible option because it expands the file system and offers a nice settings editor.
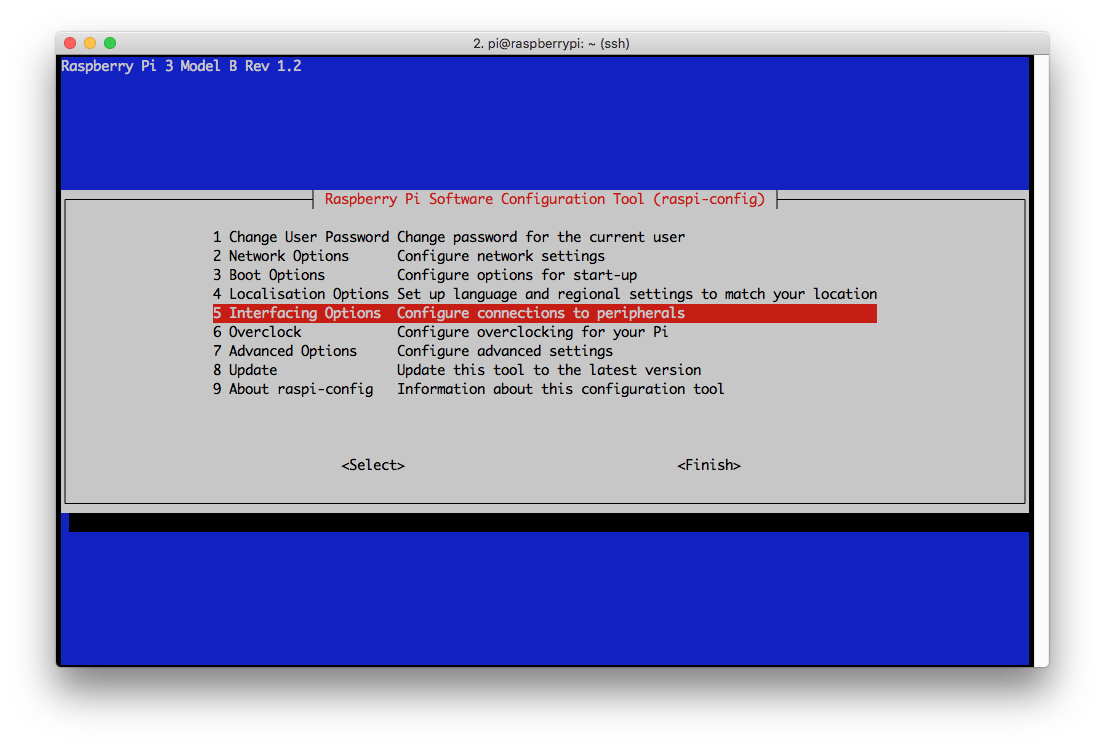
Once you have Raspbian installed you need to enable SSH access. To do this, open a terminal on the RPI and enter the command:
sudo raspi-config
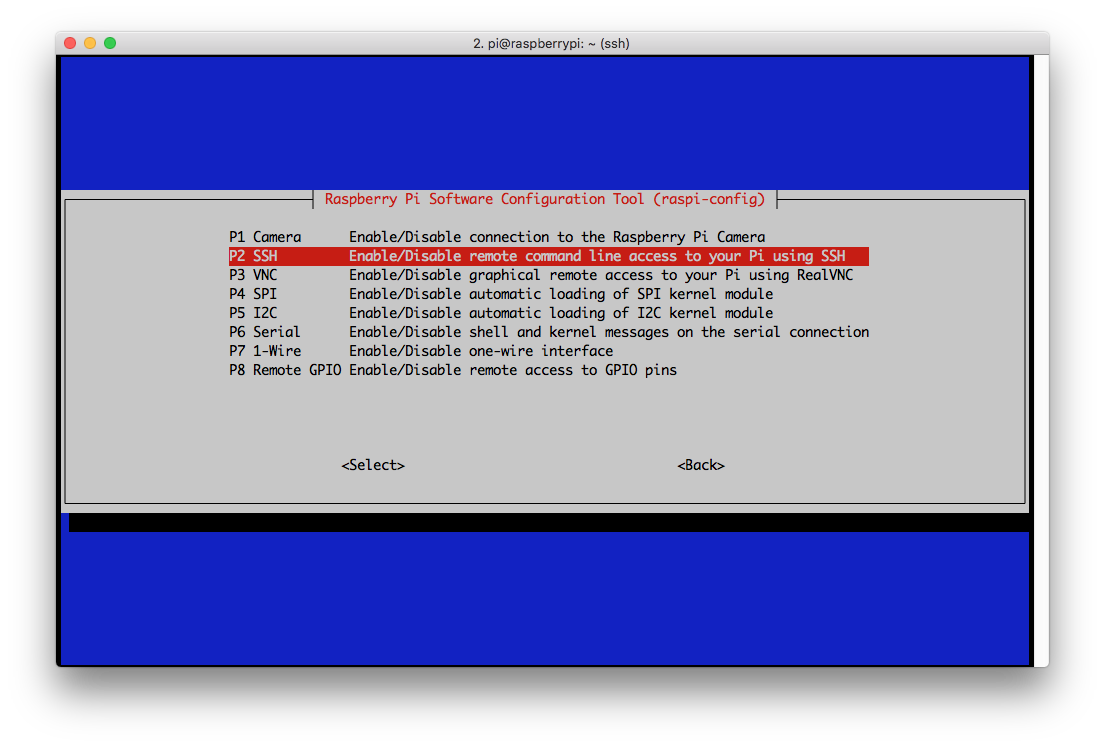
The menu below should appear. Select “Interface Options” then “SSH” and follow the instructions to enable SSH.
Next, let’s change the default password as this is a big security risk. Select “Change User Password” (option 1) and follow the instructions.
Now we need to connect the PI to the internet. If you have connected using an Ethernet cable then skip this step unless you are planning to remove it. Under “Network Options” you can configure your WiFi settings. To test they are working you can ping google.co.uk from the command line.
ping google.co.uk
This next step is optional. By default the RPI is available as http://raspberrypi.local on the local network, but you can change the “raspberrypi” bit to something more appropriate for your project. Under “Network Options” select “Hostname” and follow the instructions.
When you are ready click Finish and the RPI may ask to reboot. We can do everything else remotely now, so switch back to your PC.
Install Fabric
On your computer (not the RPI), open the terminal and navigate to your SDStore project folder and start the virtual environment. The commands below will uninstall any existing Fabric installation and replace it with Fabric3.
pip uninstall fabric
pip uninstall fabtools
pip install fabric3
pip install fabtools3
Next we need to download the fabfile.py I created. Place it in the same folder as manage.py.
The file has a few dependencies to make it more usable. Run the following commands to install them.
pip install termcolor
pip install unipath
Now we need to open the fabfile.py and change the settings at the top of the file as the comments instruct.
Add SSH Key to Pi
If you dont want to have to enter your username and password in every time you interact with the Raspberry Pi then you can add an SSH Key. If you haven’t already generated one for your PC then check out this tutorial by Github. Once you have a private-public key pair, use the following command to upload the public key to the RPI:
fab add_ssh_key:/path/to/ssh/key.pub -H raspberrypi.local
From now on you should be able to login over SSH without a password. Note: if you haven’t changed the default password this will not work.
Turning the RPI into a webserver
This process is going to take a while. It will update the RPI’s OS and install any missing dependencies.
fab install_webserver -H raspberrypi.local
Preparing your Django Project
There are a few things you need to do in order to make sure that your app runs properly on the server.
In your Django project’s settings.py file:
-
Set
STATIC_ROOTto be the full path from the root of your Raspberry PI’s filesystem to the static folder e.g./srv/[ROOT_NAME]/src/static/whereROOT_NAMEis matches the one specified int yourfabfile.py. -
Add the Raspberry PI’s .local address to the
ALLOWED_HOSTSlist. You can also add the IP Address here if you think it might be helpful, but be aware the IP can change if you haven’t configured the router. -
Change your database settings to mach the following, replacing the database name, username and password to match the ones you specified in the ```fabfile.py``.
DATABASES = {
    'default': {
        'ENGINE': 'django.db.backends.mysql',
        'NAME': 'pidatabase',
        'USER': 'sdstore',
        'PASSWORD': 'secret-password',
    }
}
Setup the website
Ok, now we are ready to upload the website and setup Gunicorn and Nginx to serve it to users. The following command will do all this for you.
fab setup_website -H raspberrypi.local
Once this process is complete open a browser and navigate to http://raspberrypi.local/ and you should see your website!
Create a superuser
In order to access the Admin panel at http://raspberrypi.local/admin we need a username and password. Run the following command and follow the instructions to create a new user.
fab create_superuser -H raspberrypi.local
Now open a browser and navigate to http://raspberrypi.local/admin and login.
That’s it. You are all setup and ready to go.
Making changes
If you want to update the RaspberryPi website at any time then make the changes locally, test and then redeploy to the RPI using the following command:
fab redeploy -H raspberrypi.local