Websocket Pong
The goal: A Raspberry Pi serving a website on which real time data streamed from a sensor are displayed. Note: The code is designed to give you an insight into how these components can work together. It is not a finished article. Elements such as error checking have been omitted in order to make the code more readable and easier to understand.
Why: Arduinos are excellent for quick hardware sensor hacks and HTML5 technologies are ideal for visualising the resulting data. Bringing the two together has endless possibilities and will give you the chance to play with writing code for Arduinos in C, a Raspberry Pi server in Python 3 and Webpages in HTML, CSS, Javascript and Websockets.
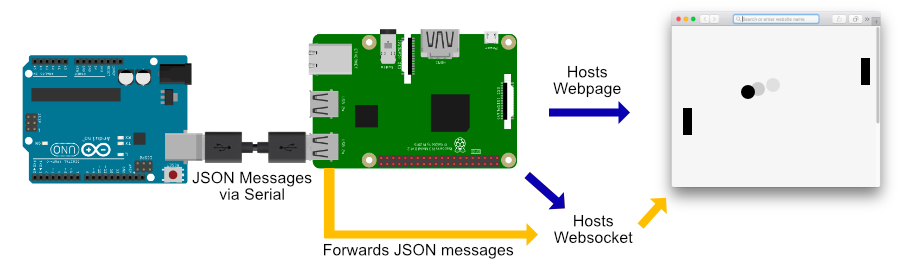
The Big Picture
- The Raspberry Pi will host a websocket connection and a website.
- The Arduino is going to read a distance measurement from a range finder sensor and send it to the Pi via the serial (USB) port.
- The Raspberry Pi will then forward these measurements to the websocket.
- A web page served by the Raspberry Pi will then connect to the websocket and use the measurements to move a paddle in a game of pong.
Things you will need
- Raspberry Pi 3 with monitor, keyboard and mouse.
- An Arduino Uno
- USB cable
- HC-SR04 Ultrasound Range Finder
- SG90 5v Servo
- Some wire
Lets Get Started
The tutorial is divided into the following sections for clarity.
1. Raspberry Pi Setup
First of all, install the latest version of Raspbian. This guide will walk you through the process. Once you have it all up and running connect the Pi to your local network. Make sure the system is up to date by opening the terminal (command line) and run the following command:
sudo apt-get update2. Flask web server setup
Next we want to get our webserver up and running. To start, make sure Python 3 is installed by running:
sudo apt-get install python3-pipCreate a new directory to hold the files we need to run the webserver and move into it:
mkdir ~/www
cd ~/www
Clone the project code from github and step into the directory:
git clone https://github.com/jkittley/Arduino-Websocket-Webpage.git
cd Arduino-Websocket-Webpage
Install all the Python requirements:
sudo pip3 install -r requirements.txtFinally test the web server by running:
sudo python3 webserver.py --prodYou should see something like this in the terminal:
<flask_socketio.SocketIO object at 0x102f610f0>
 * Restarting with stat
<flask_socketio.SocketIO object at 0x10388b128>
 * Debugger is active!
 * Debugger pin code: 661-779-075
(10072) wsgi starting up on http://0.0.0.0:80
Open the Raspberry Pi web browser and enter http://localhost in the address bar. You should see a web page being served.
3. Connect the Arduino to the web socket
The next task is to get the Arduino talking to the Raspberry Pi. Open the terminal and move to the www directory we made earlier:
cd ~/www/Clone the Arduino project code from github and step into the directory:
git clone https://github.com/jkittley/Arduino-Serial-Websocket.git
cd Arduino-Serial-Websocket
Install the Python library requirements:
sudo pip3 install -r requirements.txtIf you don’t already have the Arduino IDE installed on the Pi then run:
sudo apt-get install arduinoOpen the IDE (the & is important, it tells the terminal to open the program in the background):
arduino &Connect the Arduino to the Pi with a USB cable and make sure you have the correct port and board selected in the Arduino IDE menus.
Open the file: arduino/testconnection/testconnection.ino in the Arduino IDE and upload it to the Arduino. This script will periodically output some data so we can test the connection is working. Open the serial monitor to make sure it is outputting information periodically e.g. { test: 39 }.
Close the serial monitor and run the web server
sudo ~/www/Arduino-Websocket-Webpage/webserver.py --prodOpen a new terminal window and run the serial monitor script. This script will listen to the serial port and forward any messages to the websocket.
sudo ~/www/Arduino-Serial-Websocket/serialmonitor.pyA menu will appear asking you to select a serial port. Select the Arduino’s port from the list (usually /dev/ttyACM0 and will be the same as the one you selected in the IDE).
You should now see the serial monitoring script connect to the websocket and readings from the Arduino printed to the terminal as they are received. This shows that the Pi is hearing the messages sent from the Arduino.
Now, switch to the web server terminal window and you should see the same data streaming past e.g. from_serial_monitor: { test: 39 }. This demonstrates that the Webserver is receiving websocket messages sent by the serial monitoring script.
Finally open the web browser and open the test data page. Again you should see the test data stream by. This shows that the web page is able to connect to the websocket and it can see the messages being sent from the Arduino. In addition there is a button which will send a message back to the Arduino. The Arduino will respond by toggling the built-in LED.
4. Let’s play pong
Now we have messages passing to and from the Arduino via the websocket, let’s do something a bit more fun. Tennis anyone?
First connect the servo and range finder components as follows:
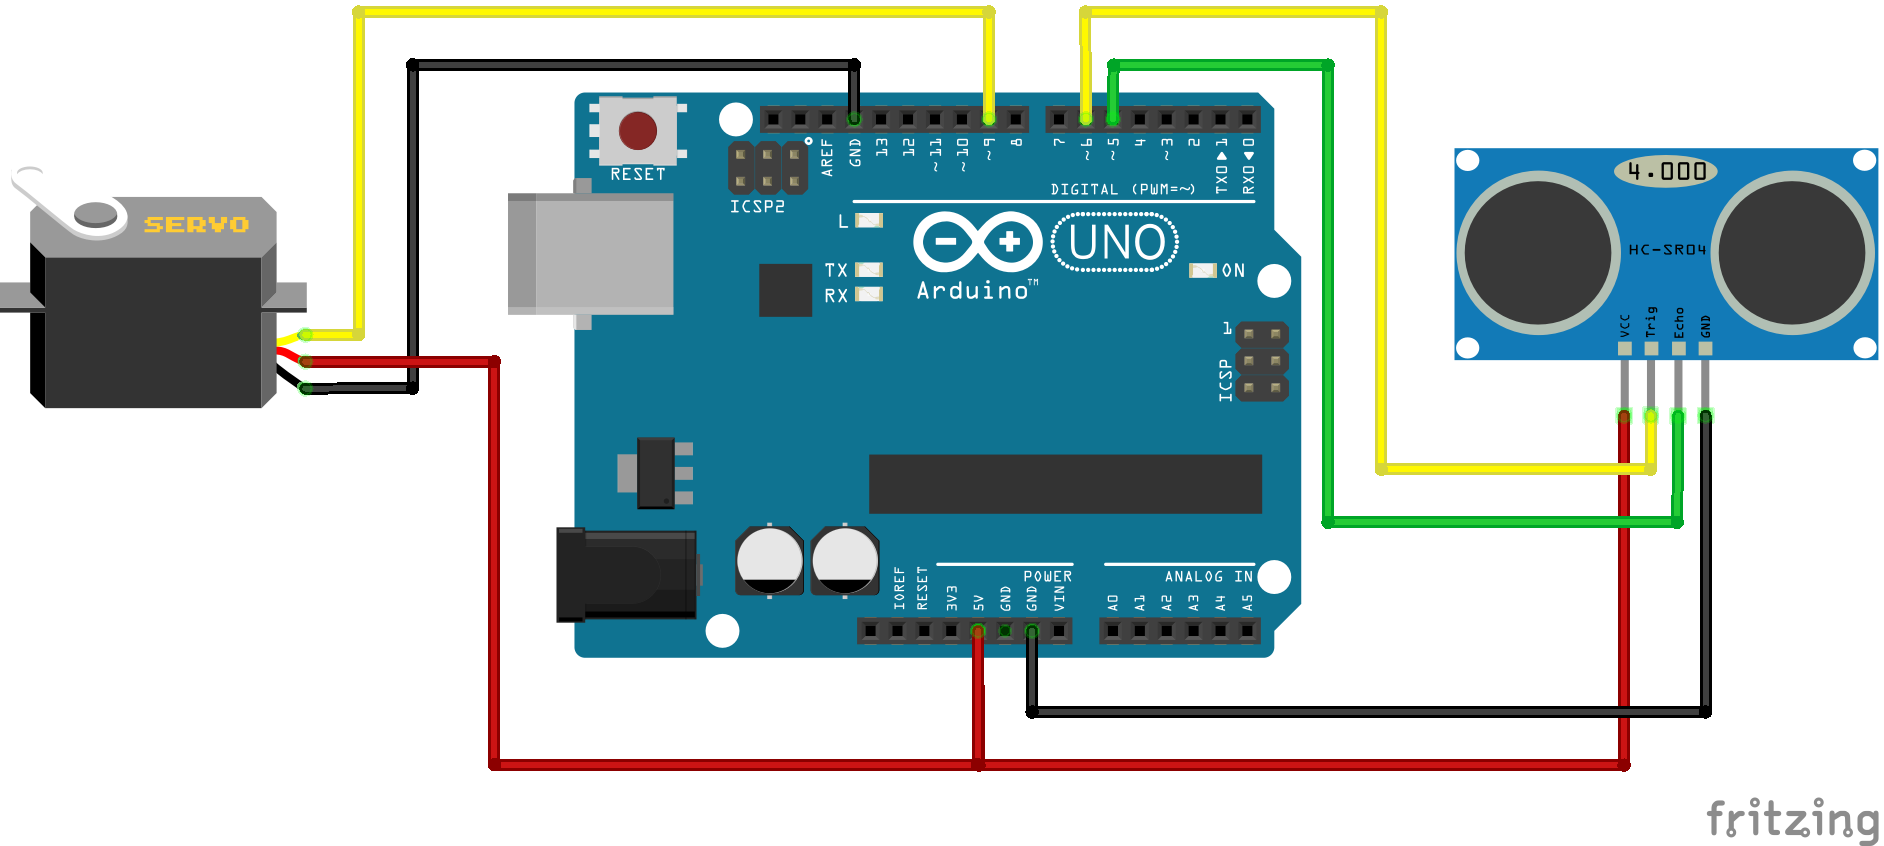
Note: SG90 wire colours may be different to those shown in the diagram. Commonly: Orange = signal, Red = Vcc and Brown = Gnd. For more color schemes click here.
Next, make sure serialmonitor.py is not running. Press Ctrl-C to terminate if it is.
Open the file: ~/www/Arduino-Serial-Websocket/arduino/pong/pong.ino in the Arduino IDE and upload it.
Restart the serial monitor script:
sudo ~/www/Arduino-Serial-Websocket/serialmonitor.pySelect ‘pong’ from the main menu of the website and see what happens. You should be able to control the left paddle by moving your hand up and down in front of the range sensor (approx 5 to 10cm). When the ball goes out of play the servo should twitch!
Extension
You may have noticed that there is another game, Snake. This game expects to control the direction of the snake. Why not try making your own Arduino script which outputs the following JSON to control the game.
- { “keystroke”: 37 } for ‘left’
- { “keystroke”: 38 } for ‘up’
- { “keystroke”: 39 } for ‘right’
- { “keystroke”: 40 } for ‘down’